
This guide is intended for system administrators at organizations implementing and distributing the BadgeR+ Wearable Duress Button. If you are looking for instructions for everyday use of your BadgeR+, view the BadgeR+ User Guide.
System administrators should be familiar with the content in both this BadgeR+ Admin & Configuration Guide and also the BadgeR+ User Guide.
The BadgeR+ Device
Let’s first get familiar with the BadgeR+ Wearable Duress Button and its components. Here is an overview snapshot of the device:

Now let’s dive into each specific component of the device:
(1) Alert Button
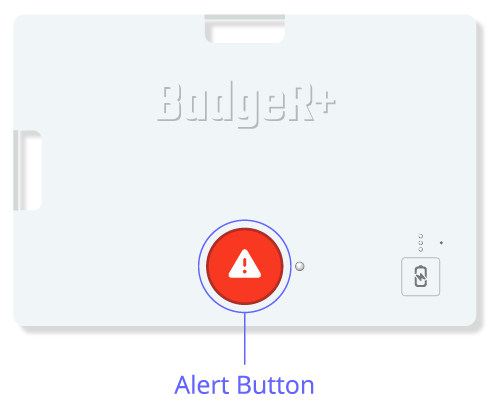
End users will activate the Alert Button when they need assistance. By default, the BadgeR+ Alert Button can be activated by:
Single click activation
Double-click activation
Press and hold activation
Visit the following URL to specifically configure which of these activation methods will be usable by your organization’s end users:
https://portal.publicsafetycloud.net/manage-settings/wifipanic-configuration
(2) Battery Button
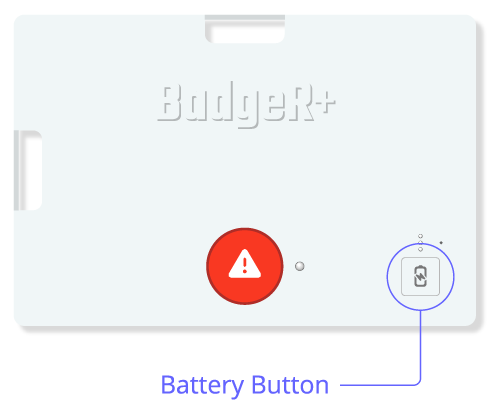
The Battery Button performs multiple functions. Pressing and releasing the Battery Button will show the current charge remaining on the Battery Indicator Lights and also perform a connection test. The current charge remaining will display on the Battery Indicator Lights. The result of the connection test will display on the Status Indicator Light. See the below sections (3) Battery Indicator Lights and (4) Status Indicator Light to learn what the specific feedback indicates.
Pressing and holding the Battery Button for 6 (six) seconds will initiate Pairing Mode. You’ll see the Status Indicator Light (to the right of the Alert Button) begin blinking blue to confirm that Pairing Mode has been initiated. While in Pairing Mode, you can connect your BadgeR+ to the appropriate Wi-Fi network. View the Configuration section for full instructions on how to connect a BadgeR+ to a Wi-Fi network when in Pairing Mode and to learn how to confirm proper configuration.
(3) Battery Indicator Lights
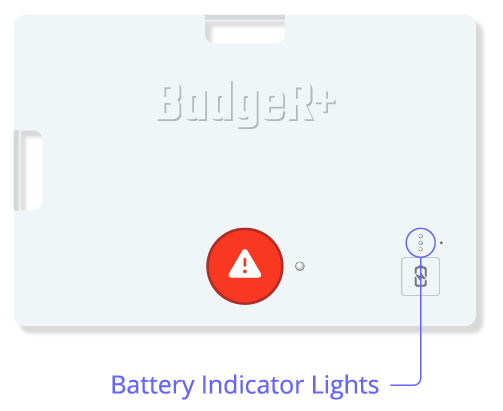
The Battery Indicator Lights will display how much charge remains on your BadgeR+ device after the Battery Button is pressed.
If all 3 (three) lights are on...
Your BadgeR+ has between 75% and 100% charge remaining
If the 2 (two) bottom lights are on...
Your BadgeR+ has between 50% and 74% charge remaining
If the 1 (one) bottom light is on...
Your BadgeR+ has between 15% and 49% charge remaining
If the 1 (one) bottom light is flashing...
Your BadgeR+ has less than 15% charge remaining and should be charged immediately
If no lights are on or flashing...
Your BadgeR+ has no charge remaining and should be charged immediately
While a BadgeR+ is being charged, it will also display feedback on the Battery Indicator Lights (after the Battery Button is pressed) to indicate how much charge is remaining:
If all 3 (three) Battery Indicator Lights are cycling on and off during charging...
Your BadgeR+ has less than 50% charge remaining and is actively charging
If the top 2 (two) Battery Indicator Lights are cycling on and off during charging, and the bottom 1 (one) Battery Indicator Light is solid...
Your BadgeR+ has between 50% and 74% charge remaining and is actively charging
If the top 1 (one) Battery Indicator Light is cycling on and off during charging, and the bottom 2 (two) Battery Indicator Lights are solid...
Your BadgeR+ has between 75% and 99% charge remaining and is actively charging
If all 3 (three) Battery Indicator Lights are solid during charging...
Your BadgeR+ is 100% fully charged
(4) Status Indicator Light

The Status Indicator Light will display the connection status of your BadgeR+ device after the Battery Button is pressed.
When configured properly, the Status Indicator Light on a BadgeR+ will blink green 4 (four) times after pressing the Battery Button (may take several seconds).
If you have already configured a BadgeR+ and the Status Indicator Light does NOT blink green 4 (four) times after pressing the Battery Button, refer to the Troubleshooting section.
(5) Microphone Hole

The Microphone Hole is a small cutout in the case that allows the microphone to transmit audio. Note that audio transmission will only occur after the Alert Button is activated AND if this feature is enabled.
6) Reset Button

In case of malfunction, you may reset a BadgeR+ device to return it to its default (and unconfigured) state. When this is done, the unconfigured device MUST be reconfigured (connected to a Wi-Fi network) before it can send alerts again.
Do NOT reset a BadgeR+ device unless you are a system administrator and you are confident the device is malfunctioning.
To reset a BadgeR+ device:
1. Press and hold the Battery Button
2. While holding the Battery Button, press the Reset Button (you may need a paperclip or other small tool to insert into the hole in the device’s casing)
3. Release the Reset Button, but continue holding the Battery Button for 5 (five) seconds.
When done correctly, this will reset the BadgeR+ device to an unconfigured state. The reset will be acknowledged when the device goes through the unconfigured sequence:
The device will vibrate once. The Status Indicator Light will cycle through RGB colors within a 5 (five) second timeframe (first red, then green, then blue, then white). Simultaneously, the Battery Indicator Lights will light up one at a time (first bottom, then middle, then top). Then the Battery Indicator Lights will display the current remaining charge (or charging status).
(7) USB-C Charging Port

Each BadgeR+ device comes with a USB-C charger cable (may be packaged in a separate box). To charge a BadgeR+, plug one end of the included USB-C charging cable into your BadgeR+ USB-C charging port (located on the bottom of the device), and the other end into a power source.
Configuration
The BadgeR+ device communicates through existing Wi-Fi networks. To properly configure a BadgeR+ device, connect it to your organization’s Wi-Fi network.
It is important to note that <strong> a BadgeR+ is only configured properly when it is connected to your organization’s Wi-Fi network</strong> (a BadgeR+ will NOT function properly anywhere off premises, or out of reach of your Wi-Fi network, such as within parking structures). Additionally, a BadgeR+ will NOT function properly when connected to any Wi-Fi network other than the Wi-Fi network it was configured to connect to.
If you press the Battery Button on an unconfigured BadgeR+, the device will go through the unconfigured sequence:
The device will vibrate once. The Status Indicator Light will cycle through RGB colors within a 5 (five) second timeframe (first red, then green, then blue, then white). Simultaneously, the Battery Indicator Lights will light up one at a time (first bottom, then middle, then top). Then the Battery Indicator Lights will display the current remaining charge (or charging status).
Connecting to Wi-Fi network
Configure a BadgeR+ device by connecting it to your organization’s Wi-Fi network:
1. In your computer’s browser, visit the following URL: https://portal.publicsafetycloud.net/manage-devices/wireless-buttons
2. Click on the sub-tab labeled ‘Button Registration’, so you can see the green ‘Pair Wireless Device’ button

3. Press the Battery Button for 6 (six) seconds on the BadgeR+ device you wish to connect to Wi-Fi (this will initiate Pairing Mode).
The Status Indicator Light will begin blinking blue to confirm the device is in Pairing Mode. While in Pairing Mode, the BadgeR+ device will NOT alert anyone if the Alert Button is pressed. Pairing Mode will last 20 (twenty) seconds after initiation.
4. After Pairing Mode is initiated, return to your browser and click the green ‘Pair Wireless Device’ button.
5. A popup window will appear that displays device names attempting to pair. Select ‘BadgeR+’ and click ‘Pair’.

If your BadgeR+ is already paired, you’ll see the text ‘Paired’ show up next to the BadgeR+ name.
6. After the device is paired, you’ll need to enter specific details for the device (user email, device name, SSID, etc.). To do so, click ‘Edit Device Details’, then enter the required information into the pop-up window that appears.

Low battery alerts will be sent to the ‘User Email’. ‘Device Name’ is the name that will be displayed when the device is activated (shown to those the alert is configured to send to). If you’re assigning 1 (one) device per individual, we recommend entering that specific individual’s information in this form. If you’re assigning this device to multiple individuals, enter the information you feel is best for representing the group who will be using the device. For help filling out these device details, email support@911cellular.com.
7. When you’re done filling out device details, click the green ‘Link Device’ button. You should now see this device show up in the ‘Active Buttons’ subtab. This device is now connected and ready to be tested for proper configuration before distribution to an end user.
Important note about Wi-Fi networks
The two most commonly used network authentication methods are pre-shared key and 802.1x. It is recommended to use 802.1x authentication. This is typically done in the form of service accounts, which should have credentials that do NOT change over time. Changing the password of a service account will disable a BadgeR+ device until it is reconfigured. Likewise, when using pre-shared keys, do NOT change the Wi-Fi password of the network the BadgeR+ is connected to, as doing so will break the connection of any BadgeR+ connected to that network.
If you must change the password for a service account / network that a BadgeR+ device is connected to, you can safely do so when ALL BadgeR+ devices connected to that service account / network are off-duty, gathered, and accounted for.
Additionally, as with connecting any new device to a Wi-Fi network, make sure the network you’re connecting the BadgeR+ to has capacity and there are enough IP addresses to allocate across the network (to avoid Access Point exhaustion).
Confirming proper configuration
Once a BadgeR+ is connected to your organization’s Wi-Fi, make sure to check its status to confirm proper configuration. To do this, simply press and release the Battery Button (do NOT press and hold). The Status Indicator Light should blink green 4 (four) times to confirm proper configuration (may take several seconds).
See the Distribution Checklist section for instructions on how to distribute one or more properly configured BadgeR+ devices.
Improperly configured devices
If a BadgeR+ device is improperly configured, the Status Indicator Light will NOT blink green 4 (four) times after that Battery Button is pressed. You may see a series of other colors and blinking lengths instead. If this is the case, see the Troubleshooting section for more in depth information on error codes.
Configuring how end users trigger alerts
End users can activate the Alert Button when they need assistance via the following configurable methods of activation:
Single click activation
Double click activation
Press and hold activation
If you haven’t done so already, visit the following URL to specifically configure which BadgeR+ activation methods will be usable by your organization’s end users: https://portal.publicsafetycloud.net/manage-settings/wifipanic-configuration
Distribution Checklist
Before distributing configured BadgeR+ devices to your community, follow this 1-2-3 checklist:
1. Check the status of each BadgeR+... again
Check the status of each BadgeR+ device you plan to distribute and make sure the device is configured properly.
2. Include the charging cable
Make sure each BadgeR+ device is distributed with the included charging cable (may have been packaged separately).
3. Inform the end user
Instruct each end user of the BadgeR+ to check the status of their BadgeR+ daily and to read the entirety of the ‘BadgeR+ User Guide’ before attempting to use the device. This is crucial to ensure their specific BadgeR+ will work properly when utilized (additionally, end users must know that any sign of an unconfigured or improperly configured BadgeR+ device must prompt them to turn this device over to you or another system administrator for troubleshooting).
Troubleshooting
An improperly configured BadgeR+ will display certain error codes. These error codes will be displayed via the Status Indicator Light after the Battery Button has been pressed. It may take some time for the Status Indicator Light to display an error code as the device is attempting to connect. The error codes are as follows:
Status Indicator Light blinks red 3 (three) times
If a Status Indicator Light blinks red 3 (three) times, this BadgeR+ is NOT connected to a Wi-Fi network.
Status Indicator Light blinks orange 6 (six) times
If a Status Indicator Light blinks orange 6 (six) times, this BadgeR+ can NOT detect Wi-Fi Access Points within range that exist within the 911Cellular system.
Status Indicator Light blinks pink 7 (seven) times
If a Status Indicator Light blinks pink 7 (seven) times, this BadgeR+ was able to connect to a Wi-Fi Access Point, but failed to be assigned an IP address by the network’s DHCP server.
Status Indicator Light blinks yellow 9 (nine) times
If a Status Indicator Light blinks yellow 9 (nine) times, this BadgeR+ is unable to communicate with the 911Cellular servers.
Status Indicator Light cycles between RGB (red, green, blue)
If a Status Indicator Light cycles between RGB (red, green, blue) then white within a 5 (five) second timeframe, this BadgeR+ is going through the unconfigured sequence (also accompanied by a vibration and cycling of the Battery Indicator Lights). To remedy this, configure the device.
Troubleshooting charging the device
If a device does NOT indicate that it is charging (the three Battery Indicator Lights do NOT cycle on and off after pressing the Battery Button while the device is charging), attempt to connect the charger to a different power source.
Additional Support
For additional questions, support, and troubleshooting assistance regarding the BadgeR+ Wearable Duress Button, email support@911cellular.com or call 216-283-6100.