
Are you a system administrator? View the BadgeR+ Admin & Configuration Guide for more specific BadgeR+ device details, configuration, and troubleshooting instructions, then return here to learn the basics as a BadgeR+ user.
For all BadgeR+ users, do NOT attempt to use your BadgeR+ until you have learned how to check its status for proper configuration. Check your BadgeR+ status daily!
Checking Your BadgeR+ Status
Congrats on receiving your BadgeR+ Wearable Duress Button! The BadgeR+ can help you get assistance fast. But first you will need to make sure your BadgeR+ is configured properly.
It is important to check your BadgeR+ status daily! Get in the habit of checking your BadgeR+ status regularly to make sure your device is configured properly before use.
Important note about Wi-Fi
It is important to note that your BadgeR+ is only configured properly when it is connected to your organization’s Wi-Fi network (a BadgeR+ will NOT function properly anywhere off premises, or out of reach of your Wi-Fi network, such as within parking structures). Additionally, your BadgeR+ will NOT function properly when connected to any Wi-Fi network other than the Wi-Fi network it was configured to connect to (configured by a system administrator).
First, press the Battery Button to view configuration status...
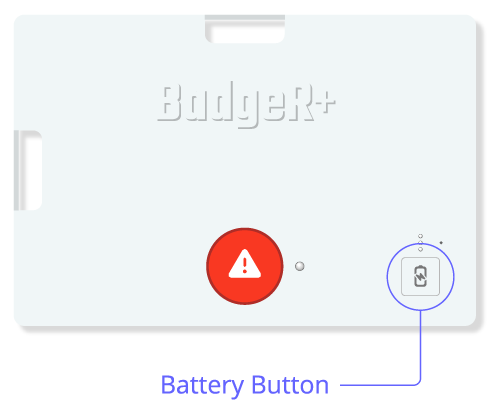
Press and release the Battery Button located in the bottom right corner of your BadgeR+ (this action will NOT trigger an alert, it is for testing your BadgeR+ configuration status). You may see a couple of different indicators, but right now we just want to focus on what the light next to the big red Alert Button is doing (The Status Indicator Light). It may take some time for the Status Indicator Light to light up as the device attempts to connect.

My Status Indicator Light blinks green 4 (four) times
If your Status Indicator Light blinks green 4 (four) times (may take several seconds after Battery Button is pressed), your BadgeR+ is configured properly and you can continue to the next step, Using Your BadgeR+.
My Status Indicator Light is doing something else
If your Status Indicator Light does NOT light up at all, your BadgeR+ may need charging. Refer to the next step, Using Your BadgeR+, for information on how to properly charge your device, then return to this step to check your BadgeR+ status again before use.
If your Status Indicator Light is cycling between RGB (red, green, blue) and white, blinking red 3 (three) times, blinking orange 6 (six) times, blinking pink 7 (seven) times, or blinking yellow 9 (nine) times, your BadgeR+ is NOT configured properly and must be given to your system administrator. If this is the case, do NOT attempt to use your BadgeR+. Notify your system administrator immediately.
Using Your BadgeR+
After your BadgeR+ is configured properly, you’ll need to know the basics on how to use it.
Checking the Battery
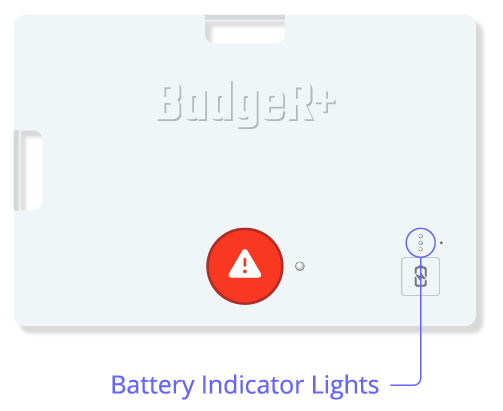
To check your BadgeR+ battery life, press and release the Battery Button in the bottom right corner of the device. You did this earlier when checking the status of your BadgeR+ configuration, but this time you’ll want to pay attention to the 3 (three) Battery Indicator Lights (just above the Battery Button)
If all 3 (three) lights are on...
Your BadgeR+ has between 75% and 100% charge remaining
If the 2 (two) bottom lights are on...
Your BadgeR+ has between 50% and 74% charge remaining
If the 1 (one) bottom light is on...
Your BadgeR+ has between 15% and 49% charge remaining
If the 1 (one) bottom light is flashing...
Your BadgeR+ has less than 15% charge remaining and should be charged immediately
If no lights are on or flashing...
Your BadgeR+ has no charge remaining and should be charged immediately
Charging your BadgeR+
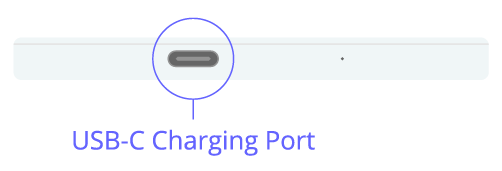
Your BadgeR+ contains a USB-C charging port and charging cable (if you have not received a charging cable for your BadgeR+, speak to your system administrator to obtain one). To charge your BadgeR+ battery, plug one end of the charging cable into your BadgeR+ USB-C charging port (located on the bottom of the device), and the other end into a power source.
After you do so, press and release the Battery Button to confirm your BadgeR+ battery is charging. The following feedback from your Battery Indicator Lights during charging will indicate how much charge currently remains on the device:
If all 3 (three) Battery Indicator Lights are cycling on and off during charging...
Your BadgeR+ has less than 50% charge remaining and is actively charging
If the top 2 (two) Battery Indicator Lights are cycling on and off during charging, and the bottom 1 (one) Battery Indicator Light is solid...
Your BadgeR+ has between 50% and 74% charge remaining and is actively charging
If the top 1 (one) Battery Indicator Light is cycling on and off during charging, and the bottom 2 (two) Battery Indicator Lights are solid...
Your BadgeR+ has between 75% and 99% charge remaining and is actively charging
If all 3 (three) Battery Indicator Lights are solid during charging...
Your BadgeR+ is 100% fully charged
If you press and release the Battery Button while charging your device and you do NOT see any of the above feedback from the Battery Indicator Lights, your device may NOT be charging and you should give the device to your system administrator immediately for troubleshooting.
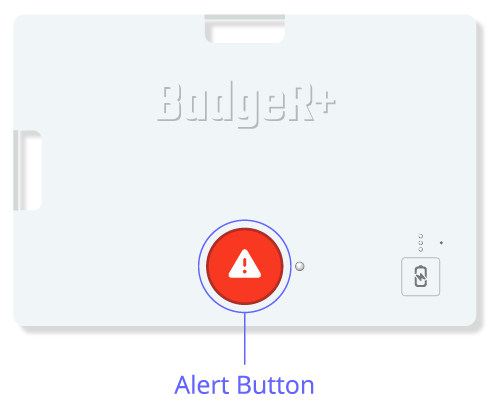
Activating the Alert Button
The BadgeR+ can activate an alert in a few ways, but it is important to note that your organization will determine which of the following activation methods are used for your specific BadgeR+:
Single click activation
Double-click activation
Press and hold activation
Do NOT attempt to use your BadgeR+ until you are certain which activation method(s) your BadgeR+ is configured for. Contact your system administrator if you are unsure which activation method(s) to use.
After activating the Alert Button, your BadgeR+ will vibrate once and the Status Indicator Light will begin to blink white as it attempts to send information to the proper persons. This may take several seconds.
On a successful activation
The Status Indicator Light will turn solid green and your BadgeR+ will vibrate several times.
On an unsuccessful activation
The Status Indicator Light will turn off (after the white blinks), and your BadgeR+ will NOT vibrate. If this is the case, seek further assistance regarding your immediate situation. Then, you MUST give your BadgeR+ to your system administrator in a timely manner. Do NOT attempt to use your BadgeR+ again under these circumstances until a system administrator has attended to your device.
If your Status Indicator Light is blinking blue while you attempt to activate the Alert Button, the alert will NOT be sent. The Status Indicator Light will only blink blue if you accidentally hold down the Battery Button for more than a few seconds. There is no reason for you to carry out this action as it is meant for system administrators to carry out during device configuration. If your BadgeR+ is in this state, you can simply wait 20 (twenty) seconds for the blinking to stop and your BadgeR+ will be usable once again.
If your organization has pre-configured audio streaming, the BadgeR+ microphone will automatically stream audio from the surrounding environment to dispatchers. This audio streaming will only take place after activating the Alert Button. The microphone hole is located to the right of the Battery Indicator Lights. After activating the Alert Button, try to keep the area around the microphone hole unobstructed if possible (in case your organization has pre-configured audio streaming).
Additional Care Instructions
Water Exposure Warning
It is important to keep your BadgeR+ away from water, as water exposure may damage the internal components of the BadgeR+.
Requesting Device Reset
If you believe your BadgeR+ device is malfunctioning, bring the device to your system administrator to request a device reset. Check your BadgeR+ status daily and when you receive a new device from your system administrator to ensure it is configured properly. Do NOT attempt to initiate a device reset unless you are a system administrator.
Additional Support
Have additional questions about your BadgeR+ device? Contact your system administrator or email support@911cellular.com.